English
Sign in
| Price | $0.15 |
| MOQ | 10pcs |
| Delivery Time | 5-8day |
| Certification | ISO9001:2015,AS9100D,ISO13485:2016,ISO45001:2018,IATF16949:2016,ISO14001:2015,RoSH,CE etc. |
| Payment Terms | L/C,D/A,D/P,T/T,Western Union,MoneyGram |
| Sample | Need to pay sample fee | Qc Control | Critical Dime |
| Roughness | Ra0.2~Ra3.2 | Service | OEM ODM,OEM/ODM |
| Method | CNC milling | Feature | durable and high precision |
| Certification | ISO9001:2015,AS9100D,ISO13485:2016,ISO45001:2018,IATF16949:2016,ISO14001:2015,RoSH,CE etc. | Surface treatment | Black oxidation |
| Drawings | 2D/3D | Payment Terms | L/C,D/A,D/P,T/T,Western Union,MoneyGram |
| Heattreatment | Available on request | Accuracy | 0.01mm |
| Heat Treatment | Annealing, Quenching, Tempering, Etc. | Price | $0.15 |
| Delivery Time | 5-8day | Oem | Available,Offered,Accept |
| Drawing Needed | PDF/DWG/DXF/IGS/STP/ X-Tetc. | Minimum Order Quantity | 10pcs |
| Quality Control | 100% Full Inspection |
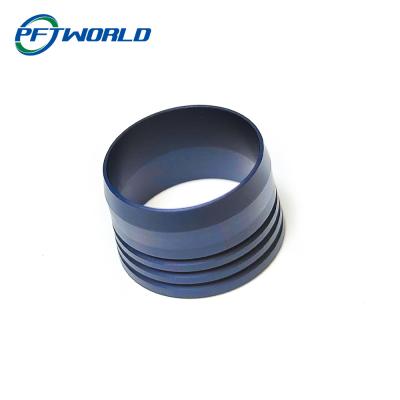
Black anodized aluminum parts are ubiquitous in premium consumer electronics, aerospace assemblies, and automotive trim due to their sleek appearance and enhanced durability. However, successfully machining these components—whether before or after anodizing—requires specific strategies to preserve both dimensional accuracy and the integrity of the hard, decorative coating.
From a manufacturing standpoint, black anodized aluminum presents a dual challenge: the soft, gummy nature of the base aluminum alloys during initial machining, and the extreme hardness and brittleness of the anodized layer during post-process finishing. This guide provides a practical, workshop-tested workflow for producing high-precision black anodized components, based on real production data.
The choice of when to anodize—before or after precision machining—is critical and defines the entire process flow.
For parts where the anodized surface bears no load or precise fit, machining the bulk material before anodizing is standard.
H3: Practical Setup & Machining Parameters for Aluminum (e.g., 6061-T6)
Tooling: Sharp, polished-flute carbide end mills (3-flute for finishing) to prevent material smearing.
Coolant: Use a copious flood of coolant to evacuate chips and prevent built-up edge, which leads to poor surface finish.
Real Shop Parameters (For Roughing):
Spindle Speed: 12,000 - 18,000 RPM
Feed Rate: 1,500 - 2,500 mm/min
Depth of Cut: 0.5 - 2.0 mm (radial), 0.2 - 0.5 mm (axial)
Surface Finish Goal: Aim for a uniform Ra 1.6 - 3.2 μm. Scratches or tool marks will be highlighted and magnified by the anodizing process.
Pro Tip: If the part requires post-anodize assembly (e.g., press-fit bearings), machine the corresponding bore 0.02-0.05mm undersized before anodizing. The anodic layer will bring it to final dimension.
Clear communication with your anodizing supplier is essential to ensure the finish meets engineering requirements.
H3: Key Anodizing Specifications to Define
Type: Type II (Decorative) for most applications, or Type III (Hardcoat) for extreme wear resistance.
Thickness: Typically 0.5 - 1.0 mil (12.7 - 25.4 μm) for Type II. Specify "Minimum" and "Maximum" to control dimensional growth.
Dye: Specify "True Black" or "Jet Black." For consistent color, request dye lot consistency across batches.
Sealing: Hot DI Water Seal or Mid-Temperature Seal. Nickel acetate sealing offers the best corrosion resistance.
Critical Data Point: The anodic layer grows approximately 50% into and 50% out of the original aluminum surface. For a 25μm (0.001") thick layer, expect a ~12.5μm (0.0005") growth on every exposed surface. This must be factored into pre-anodize tolerances.
Machining through the hard anodic layer requires a completely different approach to avoid chipping or delaminating the coating.
H3: Tooling & Strategy for Post-Anodize Work
Tooling: Use sharp, diamond-coated or polycrystalline diamond (PCD) tools. Carbide will wear rapidly.
Operation: Light, finishing passes only. The goal is to remove the anodize from specific areas (e.g., electrical contact points, sealing surfaces) without cutting into the soft substrate.
Real Shop Parameters (For De-anodizing):
Spindle Speed: 6,000 - 10,000 RPM
Feed Rate: 100 - 300 mm/min
Depth of Cut: 0.01 - 0.05 mm (Just enough to cleanly penetrate the anodic layer).
3: The #1 Problem & Solution
Problem: Chipping or "flaking" at the edge of machined features when breaking through the hard anodized layer into the soft aluminum.
Solution: Use climb milling and a toolpath that exits the cut through the anodized edge and into open air, not the other way around. This shears the coating cleanly.
Final inspection ensures the anodized coating meets both aesthetic and functional standards.
H3: Essential Quality Checks
Coating Thickness: Verify with an eddy current or magnetic induction gauge. Check multiple surfaces.
Adhesion Test: Use a cross-hatch cutter and tape per ASTM D3359. The coating should show zero removal.
Color Fastness: Perform a lightfastness test (exposure to UV) and a rub test with a wet cloth to check for dye bleed.
Electrical Isolation: For non-conductive requirements, verify with a multimeter. Anodized surfaces should be insulative.
Aerospace: Interior trim, camera housings, lightweight brackets.
Medical: Device enclosures, surgical tool handles, instrument panels.
Consumer Electronics: Laptop chassis, camera bodies, speaker grills, trim bezels.
Optical & Defense: Heat sinks, lens barrels, scope bodies (for low reflectivity).
What Drives Cost?
1. Material: Grade of aluminum (6061 vs. 7075).
2. Part Complexity: Deep pockets, thin walls, and small features increase machining time.
3. Anodizing Spec: Type III (Hardcoat) is significantly more expensive than Type II. Thicker coatings and special dyes add cost
4. Post-Anodize Machining: Any required precision machining after coating adds a separate, high-skill process step.
Q1:
Can
threads
be
tapped
after
anodizing?
A: It
is
strongly
discouraged.
The
hard
coating
will
damage
taps
and
produce
poor
threads.
Always
tap before anodizing.
For
post-assembly
adjustments,
use
thread
inserts
installed
pre-anodize.
Q2:
How
do
I
achieve
a
perfectly
uniform
black
color
on
a
complex
part?
A: Uniformity
depends
on
alloy
consistency,
surface
finish
uniformity
pre-anodize,
and
racking
during
the
anodize
process.
Discuss
part
orientation
with
your
anodizer.
Different
aluminum
series
(e.g.,
6061
vs.
2024)
will
also
dye
slightly
differently.
Q3:
Does
black
anodize
provide
the
same
corrosion
resistance
as
clear
anodize?
A: The
protective
oxide
layer
is
identical.
The
dye
itself
offers
no
extra
protection;
the
key
is
the
quality
of
the sealing
process
after
dyeing.
A
poorly
sealed
black
coat
can
be
more
prone
to
corrosion
than
a
well-sealed
clear
one.
Disclaimer: The machining parameters and data provided are based on typical workshop experiences with 6061-T6 aluminum and Type II/III sulfuric acid anodizing. Optimal settings may vary based on specific machine tools, toolholders, part geometry, and anodizing vendor processes. Always conduct test runs and consult with your manufacturing and finishing partners for critical applications.


1. Are you a manufacturer or a trading company?