
English
Sign in

| Price | 500 |
| MOQ | 1 |
| Delivery Time | 1-2days |
| Brand | FUJI-CNSMT |
| Place of Origin | Shenzhen,China |
| Certification | CE- FUJI feeder calibration Jig |
| Model Number | FUJI CP6 feeder calibration jig |
| Packaging Details | Standard woodenbox |
| Payment Terms | L/C, D/A, D/P, T/T, Western Union, MoneyGram |
| Supply Ability | 5perday |
| Place of Origin | Shenzhen,China | Warranty | 1YEAR |
| Packaging Details | Standard woodenbox | Product Name | FUJI CP6 feeder calibration jig |
| Material | stee .plastic,metal | Model Number | FUJI CP6 feeder calibration jig |
| Supply Ability | 5perday | Certification | CE- FUJI feeder calibration Jig |
| Weight | 38kg | Brand Name | FUJI-CNSMT |
| Payment Terms | L/C, D/A, D/P, T/T, Western Union, MoneyGram | Lead time | 1-2days |
| FEEDER TYPE | FUJI CP6 CP7 FEEDER | Price | 500 |
| Delivery Time | 1-2days | Minimum Order Quantity | 1 |
| Voltage | 110v/220v option | Manufacturer | CNSMT |
| Product Model | FUJI CP6 feeder calibration jig | Application | FUJI CP6 pick and place machine |
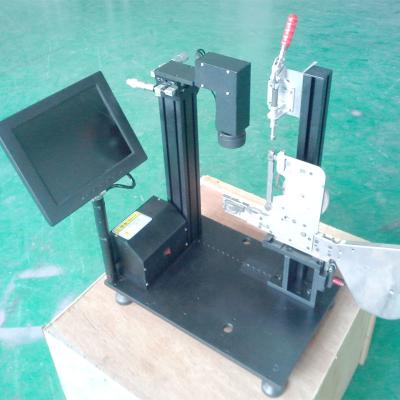
FUJI CP6 CP7 SMT Feeder Calibration Jig Instrument 106 Kpa 250V 50Hz
FUJI CP6 CP7 feeder calibration jig,SMT FEEDER calibration instrument
Product Description
FUJI
CP6
FEEDER
Calibrator
1.
The
structure
of
the
whole
machine
is
simplified,
the
operation
is
simple,
and
the
function
is
optimized.
And
use
high-precision
gears
to
ensure
position
stability
and
greatly
improve
work
efficiency.
2. Accuracy testing. Reclaiming position, height, and pressure bar height can all be accurately measured. Can better grasp the quality status.
3. The use of color LED display, LED lighting, 50 times magnification CCD camera, make the structure more compact and beautiful. Effectively reduce eye fatigue and improve the quality of work.
4. It is easy to operate, and can simulate the placement machine, automatically and continuously observe the picking position, can more clearly grasp the continuous running quality of FEEDER, so as to more effectively control the throwing rate.
Functions
and
features:
1.
X-Y-Z
axis
adjustment;
2.
Axis
camera
that
can
be
adjusted
directly;
3.
Built-in
220V
DC
power
supply;
4.
Cross
cursor
with
scale;
5.
Auto
and
step
function;
6.
LED
display;
7.
Feeder
control
fixture;
8.
8*2mm/12*4mm/16*8mm
and
24*8mm
feeder
control
belt.
Purpose: FEEDER calibration instrument is used to calibrate the model FEEDER

2.
Product
specifications
2-1.
Equipment
main
parameters:
2-1-1. Input power: AC220V (50HZ),
2-1-2. Rated power: 45 W
2-1-3. Supply equipment air pressure: 0.5MPa(=5bar)
2-1-4. Overall dimensions (body size): length×width×height=450mm×300mm×540mm
2-1-5. Equipment weight (excluding monitor): 28Kg
2-1-6.
Adjustable
stroke
of
the
transmission
part:
X
direction:
37±0.5mm
Y
direction:
37±0.5mm
2-2.
Component
parameters:
2-2-1.
CCD
camera:
Parameter
index
data
Color
CCD
size
1/4
inch
Resolution
400TVL
Signal
system
PAL
Minimum
illumination
(F1.2)
≤1.5Lux
Lens
interface
C/CS
Working
voltage
DC
12V
Working
temperature
-10℃~+50℃
Working
environment
Humidity:
40%~95%,
atmospheric
pressure:
86Kpa~106
Kpa
2-2-2. Magnifying lens:
Telecentric
lens,
adjustable
distance
10MM---800MM
2-2-3.
Color
liquid
crystal
display:
Power
source:
AC:
180~250V
50Hz
Power
consumption:
15W
Video
input:
0.7~1.4Vpp,
75Ω
Case
structure:
plastic
case,
LCD
panel
Colour:
Black
Horizontal
center
definition:
≥800TVL
Dimensions:
300
(W)
×
300
(H)
×
100
(D)
Weight:
38Kg
2-2-4.
Work
lights:
Working
voltage:
DC
12V
Rated
power
consumption:
10W
2-3.
Working
environment
conditions:
Temperature:
+10℃~+35℃
Humidity:
below
50%
(35℃)
below
90%
(20℃)
Surrounding
environment:
There
should
be
no
corrosive
gas.

3.
How
to
use
the
product
3-1.
Preparation
before
inspection
*
Please
install
the
monitor
and
connect
it
to
a
220v
power
supply.
Use
a
video
signal
cable
to
connect
the
CCD
output
terminal
to
the
video
signal
input
interface
of
the
monitor.
*
Connect
the
DC
plug
cable
to
the
power
input
jack
of
the
CCD
camera.
*
Connect
the
power
supply
of
the
electrical
control
box
to
the
220v
power
supply.
*
First
turn
on
the
switch
on
the
back
of
the
electrical
control
box
and
the
power
switch
of
the
display.
At
this
time,
there
will
be
a
cross
scale
cursor
displayed
on
the
display;
if
it
is
not
displayed,
please
check
whether
the
power
supply
and
signal
wires
are
correct.
Adjust
the
brightness
and
contrast
of
the
display
until
the
display
is
clear.
*
Install
the
calibration
ruler
on
a
FEEDER
with
the
best
placement
rate
in
production,
install
the
FEEDER
on
the
placement
platform,
and
fix
it.
*
Cycle/Stop
button:
Press
the
Cycle/Stop
button
once,
and
the
motor
will
drive
the
feeder
one
step
forward.
Keep
pressing
the
Cycle/Stop
button,
and
the
machine
will
automatically
drive
the
motor
to
drive
the
feeder
forward
until
the
button
is
released.
*
Auto/Manual
key:
Press
the
Auto/Manual
key
once,
the
display
light
is
on,
press
the
Cycle/Stop
key
once
to
drive
the
motor
to
continuously
drive
the
feeder
forward.
Press
the
Cycle/Stop
key
again,
and
the
drive
motor
will
pause.
*
Speed
control
key:
Adjust
the
Speed
control
switch,
and
the
speed
of
driving
the
motor
will
change
accordingly.
3-2.
Measurement
method
Rotate
the
adjustment
knobs
in
the
X,
Y,
and
Z
directions
to
move
the
cross
cursor
in
the
display
to
the
center
of
the
suction
position
of
the
standard
feeder,
and
make
it
consistent
with
the
center
of
the
cross
scale
cursor.
Use
the
cross
scale
cursor
as
a
reference
to
determine
the
to-be-calibrated
Feeder
feed
interval
position.
3-3.
Adjustment
of
feeder
If
necessary,
make
the
following
adjustments.
(1)
Adjustment
of
interval
position
in
X
direction
(2) Confirm
① Confirm the interval position
② Confirmation of the position of the shutter
3-3-1. Adjustment of interval position in X direction
(1)
First
use
the
standard
feeder
to
determine
the
correct
feeding
interval
position,
(2)
Install
the
calibration
ruler
on
the
feeder
to
be
adjusted.
Note:
The
calibration
ruler
should
be
measured
from
a
position
about
30mm
away
from
the
front
hole.
(3)
Please
remove
the
end
cover
of
the
feeder
that
needs
to
be
adjusted
(as
shown
in
Figure
1),
and
then
install
it
on
the
base
of
the
feeder.
(4)
Slightly
loosen
the
fixing
screw
of
the
worm
gear.
(5)
Rotate
the
motor
shaft,
clamp
the
anti-rotation
device
on
the
shaft
to
the
body
card
position,
and
press
it
with
your
fingers.
At
this
time,
the
motor
shaft
does
not
move.
Rotate
and
adjust
the
worm
gear
rod,
the
worm
gear
drives
the
big
gear
to
adjust
the
feeding
position
to
the
correct
position,
so
that
the
interval
position
of
the
correction
ruler
is
adjusted
Align
the
hole
with
the
center
of
the
cross
cursor
in
the
display,
and
then
tighten
the
worm
gear
fixing
screw.
(6)
Load
and
unload
the
feeder
twice,
confirm
that
the
interval
position
has
not
changed,
(7)
Press
the
forward
button
on
the
feeder
several
times
to
confirm
whether
the
feeding
position
is
correct.
3-3-2.
Confirm
(1)
Confirm
the
interval
position
After
adjustment,
confirm
the
interval
position
on
the
fixture
body,
if
the
position
is
skewed,
please
re-adjust
it.
Note:
When
confirming
the
interval
position,
please
press
the
"inching"
key
while
selecting
the
position
to
confirm.
In
addition,
load
and
unload
the
tape
feeder
3
times,
Confirm
the
location
repeatedly.
(2)
Confirm
the
position
of
the
shutter
On
the
feeder
base,
confirm
the
center
of
the
shutter
in
the
X
direction
Whether
the
heart
is
in
the
center
of
the
cross
cursor
in
the
microscope.
If
the
position
is
too
skewed,
replace
the
upper
guard.
4.
Maintenance
4-1.
Daily
inspection
(1)
Please
check
the
contact
surface
of
the
feeder
and
the
feeder
base
for
bumps
and
foreign
objects
(dirt,
etc.)
caused
by
the
collision.
(2) Please use your eyes to check whether the correction ruler is bent, and check whether the sprocket bite hole is worn or not.
(3) The feeder calibration instrument needs to be kept clean. Do not bump the feeder against the body of the machine during debugging. The surface should be wiped after each use. The feeder base should be added with a proper amount of lubricating oil. After the calibration ruler is used up, its integrity should be ensured to avoid deformation and affect accuracy.
(4) After using the calibrator, if you do not use it for a long time, please cover the magnifying lens cover to prevent the lens from getting dirty and damaged.
| samsung feeder calibration jig |
| siplace feeder calibration jig |
| smd feeder calibration jig |
| smd tape feeder calibration jig |
| smt feeder parts calibration jig |
| smt feeder types calibration jig |
| yamaha cl feeder calibration jig |
| yamaha feeder calibration jig |
How can i buy machine from you ?
(1) Consult us on line or by e-mail
(2) Negotiate and confirm the final price , shipping , payment method and other terms
(3) Send you the perfroma invoice and confirm your order
(4) Make the payment according to the method put on proforma nvoice
(5) We prepare your order in terms of the proforma invoice after confirming your full payment . And 100% quality check before shipping
(6) Send your order via express or by air or by sea .
Packing & Delivery


Certification

Company Information
CNSMT
is
the
leading
manufacturer
and
supplieir
for
SMT
machines
and
Solution
with
over
10
years'
experience
in
China.
And
we
can
also
do
OEM&ODM
for
SMT
traders,
we
have
vast
of
sources
in
SMT
field,even
you
need
used
or
new
SMT
equipments
or
other
parts,
we
can
help
you
get
the
best
quality
and
competitive
cost
machines.
What
we
can
do
for
you:
※
We
have
our
own
factory
make
SMT
equipments
and
devices
※
We
have
a
professional
technich
engineer
team
for
produce
machines
※ We can customize variety of SMT machines for you according your requirements
※ We buy and sell used and new SMT equipments all over the world
※
We
provide
you
SMT
full
line
machines
and
export
to
worldwide
※
Becoming
the
most
reliable
Chinese
partner
for
you.
FAQ:
1. Are you factory?
Yes, we are factory supplier focus SMT machines and devices for 14 years.
2. Can you email the catalog?
Yes, we can send you by email with whole catalog.
3. How to order online?
Confirm
product
(quantity,
price,
payment,
shipping
etc)---waiting
for
email
---confirm
order---make
initial
payment---production
finish---make
balance
payment---shipping
*
click
to
learn
about
trade
assurance
4.
What
about
the
payment
way?
100%T/T
advance
or
30%
deposit,
balance
paid
before
delivery
--
amount
>
USD5,000
100%
deposit
--
amount
<
USD5,000
5.
What's
the
shipping
way
and
timing?
We will ship the machine by DHL,Fedex, UPS,etc (Door to Door Service), around 5 days to arrive.
Or by Air to your airport (Door to Airport Service ), around 3 days to arrive.
Or by Sea to the seaport, Minium CBM requirement : 1 CBM, around 30days to arrive.
6. What's the warranty item?
1 year warranty free for spare parts, Whole life technicial support.
We have professional after sales team, if any question, assistant videos are also provided in after-sale service.


